The very purpose of agile is to help you get your work done in an empirical and iterative way, at a sustainable pace. I guess that’s why it feels so good to pick up an issue in Jira and, after a hard day’s work, mark it as “Done!”
But if you and your team break down your work into small, easily digestible work items, the Jira issues for those work items can quickly pile up and begin to clutter your boards and backlog.
And since you’re here reading this article, I’m going to make an educated guess that you want to learn how to hide them. (Or you know how to, but something in Jira is not working out.)
To help you out, let’s you and I spend some time talking about how to hide completed issues in Jira. We’ll also go over a few common mistakes and pitfalls to avoid as you set this up, so read on below and be sure to get all the way to the end.
How to Hide Completed Jira Issues on a Kanban Project
There are two ways to hide the “Done” issues from your Kanban board in Jira. One is to set up Jira to automatically hide completed issues every few weeks. The other is to release the completed issues in a version.
Option #1: Hide Done Issues Every Few Weeks
If you manage your work on a Kanban board and you want to hide the issues that you and your team have marked as “Done,” you can configure Jira to do this automatically for you every few weeks.
How to set this up:
Step 1: Fire up your web browser, log in to your company’s Jira instance, and open your team’s Jira project.
Step 2: Go to the Kanban board from the left sidebar.
Step 3: Click on the gray icon with the three dots in the upper right corner of the screen and go to “Board settings.”
Step 3: Select a time period in the “Hide completed issues older than” field. You can choose from 1 week, 2 weeks, and 4 weeks. You can also decide to never hide completed issues from your Kanban board.
Step 4: Jira then automatically hides all issues whose last update date is older than this time period.
Option #2: Release Done Issues
If you’re part of a software team and you do release management, then you can hide “Done” issues from your Kanban board by releasing them in versions.
How to do this:
Step 1: Fire up your web browser, log in to your company’s Jira instance, and open your team’s Jira project.
Step 2: Go to the Kanban board from the left sidebar.
Step 3: Click on the gray “Release” button in the upper right corner and select “New version.”
Step 4: Give the release version a name and, optionally, a description, then hit the blue “Release” button.
Step 5: The completed issues will be released in a version and hidden from the completed column. To view them, go to the “Releases” tab from the left sidebar view the details of the release.
Completed Jira Issues Won’t Hide on a Kanban Project
Sometimes, the Jira issues that you and your team have marked as “Done” during the sprint don’t get removed from the Kanban board, even after the time for hiding them automatically has elapsed or you’ve released a version.
This typically happens after somebody tweaked the columns and statuses to better reflect the team’s workflow, but for one reason or another, they didn’t do it properly. So here’s how to troubleshoot it.
How to fix this:
Step 1: Fire up your web browser, log in to your company’s Jira instance, and open your team’s Jira project.
Step 2: Go to the “Kanban board” tab from the left sidebar.
Step 3: Click on the gray icon with the three dots in the upper right corner of the screen and go to “Board settings.”
Step 4: Go to the “Columns” tab under “Settings.”
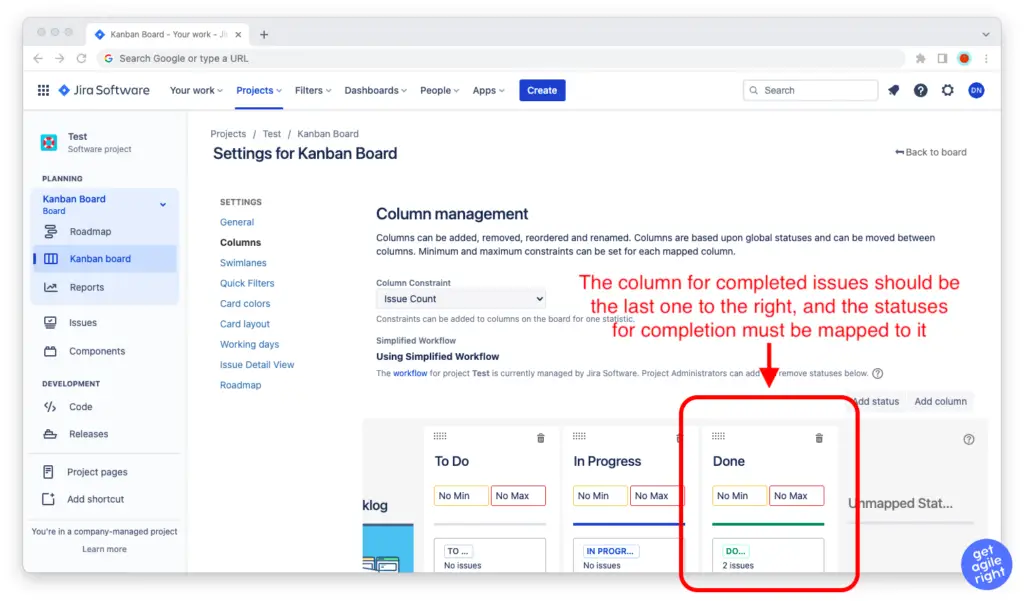
Step 5: Check your columns and statuses. Make sure that the column for completing issues is the last column on the right—and that all statuses indicating completion are mapped to that column.
How to Hide Completed Jira Issues on a Scrum Project
If you manage your work on a Scrum board and you want to hide the issues that you and your team have marked as “Done” during the active sprint, all you have to do is complete the sprint.
How to complete a sprint in Jira:
Step 1: Fire up your web browser, log in to your company’s Jira instance, and open your team’s Jira project.
Step 2: Go to the “Active Sprints” tab from the left sidebar.
Step 3: Click on the gray “Complete sprint” button right above the sprint backlog.
When you complete the sprint, all issues marked as “Done” will be hidden from the sprint and the product backlogs. All issues in other columns and with other statuses will be returned to the product backlog.
Per the Scrum Guide, the sprint should be completed after the outcomes of the sprint have been inspected at the Sprint Review and the team has had a chance to plan ways to increase quality and effectiveness at the Sprint Retrospective.
Completed Jira Issues Won’t Hide on a Scrum Project
Sometimes, the Jira issues that you and your team have marked as “Done” during the sprint don’t get removed from the product backlog, even after you’ve completed the sprint.
This typically happens after somebody tweaked the columns and statuses to better reflect the team’s workflow, but for one reason or another, they didn’t do it properly. So here’s how to troubleshoot it.
How to fix this:
Step 1: Fire up your web browser, log in to your company’s Jira instance, and open your team’s Jira project.
Step 2: Go to the “Active Sprints” tab from the left sidebar.
Step 3: Click on the gray icon with the three dots in the upper right corner of the screen and go to “Board settings.”
Step 4: Go to the “Columns” tab under “Settings.”
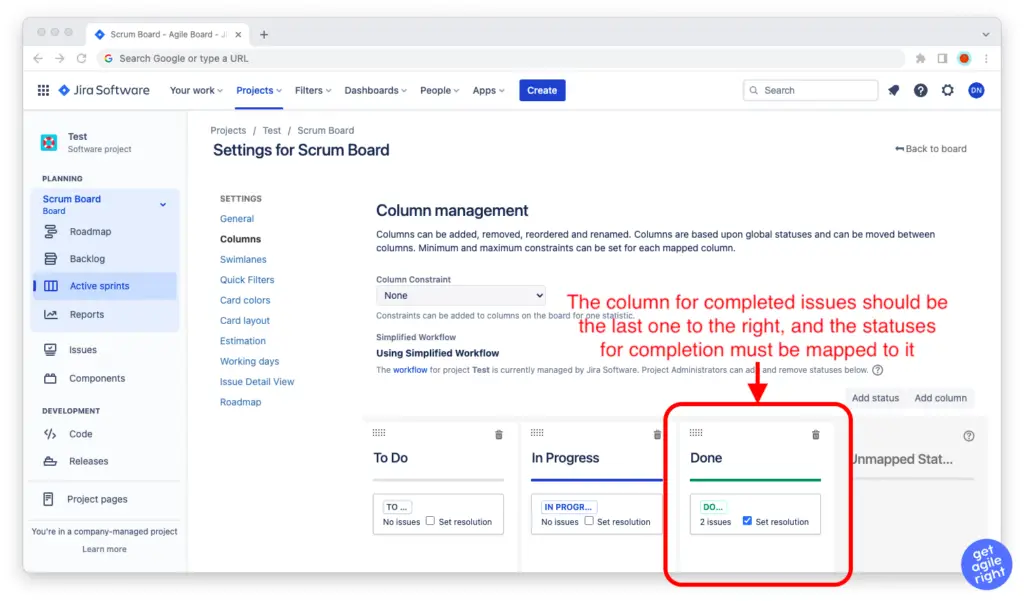
Step 5: Check your columns and statuses. Make sure that the column for completing issues is the last column on the right—and that all statuses indicating completion are mapped to that column.
